Breast augmentation has long been one of the most popular cosmetic procedures worldwide, offering individuals the opportunity to enhance their silhouette and boost self-confidence. As a board-certified plastic surgeon, I have witnessed the fascinating evolution of implant technology and how it has transformed patient outcomes. Historically, saline implants held a significant share of this market, prized for their adjustability and perceived safety. However, recent trends reveal a marked decline in their popularity, driven by advancements in silicone implants and the discontinuation of the Ideal implant.
The FDA Ban on Silicone Implants
In 1992, the FDA placed a moratorium on silicone breast implants due to concerns over their safety, particularly regarding the potential for leakage and its suspected connection to autoimmune diseases. During this period, saline implants became the only available option for breast augmentation in the United States. From 1992 to 2006, patients and surgeons relied exclusively on saline implants, which, while safe, were often criticized for their aesthetic and tactile limitations.
Lack of Advancement in Saline Technology
Despite their dominance during the FDA ban on silicone implants, saline implants saw little innovation over this 14-year period. Major manufacturers in the U.S., including Mentor and Allergan, largely focused their efforts on refining silicone implant technology in anticipation of the ban being lifted. As a result:
- Stagnation in Design: Saline implants retained the same basic design, with no significant advancements to address issues like rippling or unnatural feel.
- Limited Options: Compared to the evolving variety of silicone implants, saline options remained static, offering fewer choices in terms of shape, texture, and customization.
This lack of innovation left saline implants at a disadvantage once the FDA lifted the moratorium in 2006 and approved cohesive silicone gel implants for general use.
Safety Comparisons: Silicone vs. Saline
Safety remains a critical consideration in choosing the right breast implant. Several factors differentiate silicone and saline implants:
- Capsular Contracture: Both implant types can lead to capsular contracture, a condition where scar tissue tightens around the implant. However, studies suggest that smooth silicone implants generally show lower rates of capsular contracture compared to smooth saline implants. Motiva implants, for instance, which are advanced silicone implants, report particularly low rates of capsular contracture thanks to their SilkSurface technology designed to enhance biocompatibility.
- Rupture: Saline implants deflate visibly upon rupture, allowing for immediate detection. In contrast, silicone implants may have a “silent rupture,” where cohesive gel stays in place, often undetectable without imaging. However, the cohesive nature of modern silicone implants like Motiva significantly reduces leakage risks, providing an additional layer of safety.
- Breast Implant-Associated Anaplastic Large Cell Lymphoma (BIA-ALCL): Textured silicone implants have been linked to a higher incidence of BIA-ALCL compared to smooth saline or smooth silicone implants. Smooth silicone options, like those offered by Motiva, are designed to minimize this risk further.
Textured Implants and Motiva’s NanoSurface Technology
Traditionally, textured silicone implants have not been commonly used in the U.S. for cosmetic breast augmentation. This is primarily due to concerns over higher risks of BIA-ALCL and patient preference for smoother options. Textured implants were originally designed to reduce capsular contracture and prevent implant movement, but these benefits have been overshadowed by safety concerns.
In contrast, Motiva implants incorporate NanoSurface technology, which offers many of the advantages of textured implants without the associated risks. The surface is designed to enhance tissue integration and reduce capsular contracture while maintaining a safety profile comparable to smooth implants. This innovation bridges the gap between traditional smooth and textured implants, making Motiva a compelling option for patients seeking both safety and performance.
The Evolution of Implant Technology
Silicone implants have undergone a dramatic evolution since their reintroduction. Early models were often criticized for their risk of leakage and aesthetic limitations, but modern silicone implants, particularly cohesive gel implants, have addressed these issues comprehensively. Often referred to as “gummy bear” implants, these devices offer:
- A Natural Look and Feel: Silicone gel mimics the consistency of natural breast tissue more closely than saline, resulting in superior aesthetic outcomes.
- Durability and Safety: Advances in cohesive gel technology minimize the risk of rupture and leakage, providing peace of mind to patients.
- Variety: Silicone implants are available in a wider range of shapes, sizes, and profiles, allowing for a highly customized approach to breast augmentation.
The Rise of Motiva Implants
One notable innovation in implant technology is the emergence of Motiva implants. These silicone implants have gained attention for their advanced safety features and cutting-edge design. Motiva implants are known for:
- SilkSurface and NanoSurface Technology: These surface textures are designed to reduce the risk of capsular contracture and improve biocompatibility.
- Dynamic Gels: Offering a natural look and feel, Motiva’s gels adapt to movement for enhanced comfort and aesthetic outcomes.
- Safety Data: Clinical studies have shown low rates of complications, including rupture and capsular contracture, making them a compelling choice for patients seeking safety and aesthetics.
For more information on Motiva implants and their safety profile, visit Motiva’s official site.
The Demise of the Ideal Implant
The Ideal implant, introduced as a hybrid option, sought to combine the safety profile of saline with the aesthetic appeal of silicone. Featuring a structured design that reduced rippling and improved contour, the Ideal implant garnered attention for its innovative approach. However, despite its promise, the implant failed to gain widespread traction.
Several factors contributed to its downfall:
- Limited Adoption: Many surgeons were slow to adopt the technology, citing higher costs and limited patient awareness.
- Competition from Silicone: With cohesive gel implants continuing to improve, the Ideal implant struggled to differentiate itself in a competitive market.
- Manufacturer Challenges: The company behind the Ideal implant ceased production, leaving patients and surgeons to explore other options.
Why Saline Implants Are Falling Out of Favor
Beyond the rise of silicone implants and the demise of the Ideal implant, saline implants have faced their own set of challenges. These include:
- Aesthetic Limitations: Saline implants are more prone to rippling, especially in patients with thin or minimal breast tissue.
- Tactile Disadvantages: The feel of saline implants is often described as less natural compared to modern silicone options.
- Lack of Innovation: While silicone technology has advanced rapidly, saline implants have remained largely unchanged, leaving them less appealing to today’s informed patients.
The Future of Breast Augmentation
As technology continues to advance, the trend toward silicone implants is unlikely to reverse. Innovations in implant design, such as textured surfaces and improved shape retention, have made silicone the preferred choice for both patients and surgeons. Additionally, non-surgical alternatives and fat transfer techniques are gaining traction, further diversifying the options available for breast enhancement.
For those considering breast augmentation, the key is to work closely with a board-certified plastic surgeon to determine the best option based on individual anatomy, aesthetic goals, and lifestyle considerations.
Conclusion
The decline of saline implants marks a pivotal moment in the evolution of breast augmentation. With the demise of the Ideal implant, the FDA’s approval of cohesive silicone gel technology, and the stagnation of saline innovation during the 1992-2006 moratorium, the field has entered a new era of innovation and patient satisfaction. For those seeking natural-looking, durable results, the choice is clear: the future belongs to silicone. If you are considering breast augmentation and want to explore the best options for your unique goals, I, Dr. Sam Jejurikar, would be delighted to guide you through the process. Contact my office today to schedule a consultation and take the first step toward achieving your ideal look.
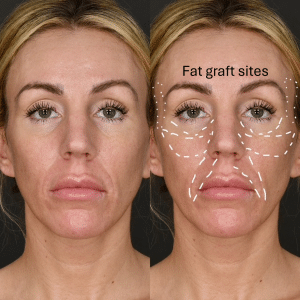 In a recent case, I performed facial fat grafting under general anesthesia, administering a total of 22 mL of fat strategically placed to restore volume and smooth contours:
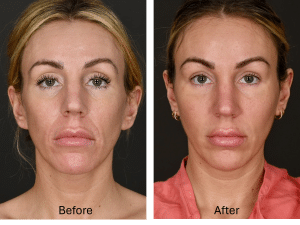 Understanding Fat Properties: Molecular Weight and Region-Specific Application